Home

For a while I’ve been wanting to create a pallet wall but what has stopped me is I wasn’t sure where to create the wall but mostly all the collecting and dismantling of the pallets.  At work we were brainstorming ideas for a backdrop for a video series we are going to do so it was  a perfect opportunity to try it out.  The process to create the faux distressed wood was pretty easy so I thought I’d write my first tutorial on how to do it.

faux-pallet-wall-tutorial

Tools You’ll Need

  • Hammer
  • Chisel
  • Saw blade
  • Nail gun
  • (optional) Ziplock bag full of random nails and screws

Materials You’ll Need

  • Wood Stain (I used Minwax Jacobean and Ebony wood stain)
  • Pine wood (I used 1×4’s in the project)
  • Sand Paper

Time It Takes

The process of distressing the wood took about 45 min.  Staining and building took two half days because of dry time.

tools-needed-to-distress-wood
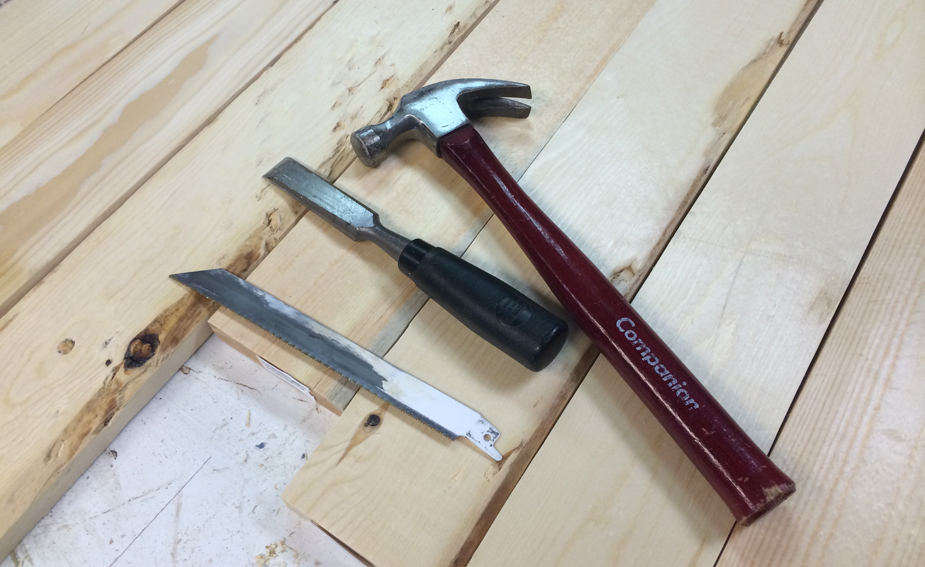
Before you begin, you’ll want to grab a hammer, chisel, and/or anything that looks sharp from your tool box like screw driver, paint can opener, old saw blades. You can also grab some nails and screws and put them in a Ziplock bag (grab a couple of bags because they will get holes in them pretty quick). Once you have all of your tools and materials…it’s time for the project.

Any size nails and screws will work for this project. I had a cup full of random screws and nails that varied from drywall screws to tiny nails that hold up picture frames

Step 1.

Lay all of your pieces out next to each other. If your wood has nice crisp edges, take a sander (or sandpaper 220 grit) to them until you get a soft edge. There isn’t a science to this part, just knock down some of the edge so that the wood doesn’t look like it came from a box store.

Step 2.

Take your bag of screws, hold them a foot or so above the material and drop them on the wood. (If you have kids, this is a good part to get them involved). Drop, rub, throw the bag on the wood so that it creates dents and scratches on the planks of wood. At this point you can take any of the sharp items and do the same. I took my hammer and paint can opener and randomly hit and gouged the wood to create a more dramatic look in some areas. Once you’ve gotten all the aggression out and your kids are hyper, it’s time to send them back into the house 😉

Keep in mind that the deeper the gouge/dent and the longer you leave the stain on the wood, the darker the wood will be when it is finished. I found that even though I felt like I went overboard on the dents and scratches, I could have actually done more.

deep-scratches

Step 3.

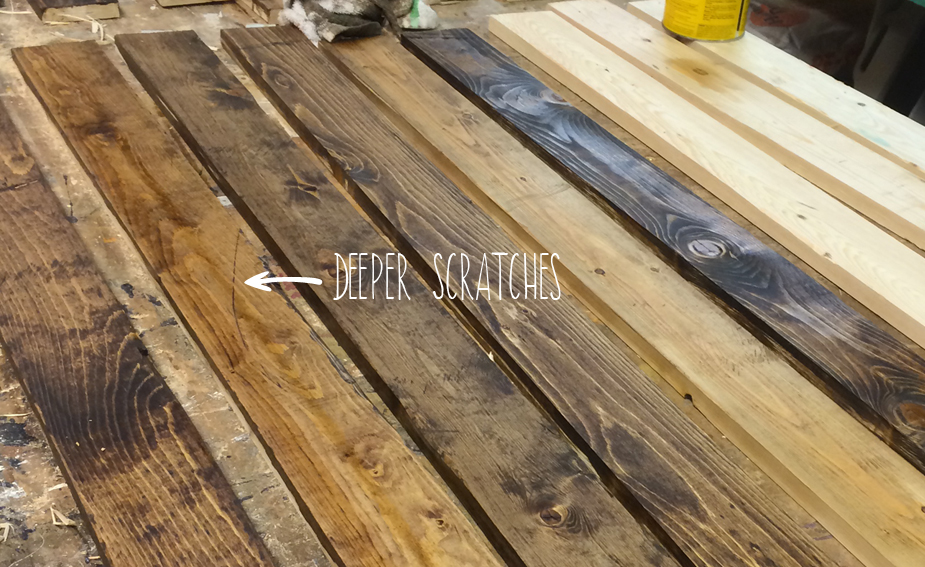
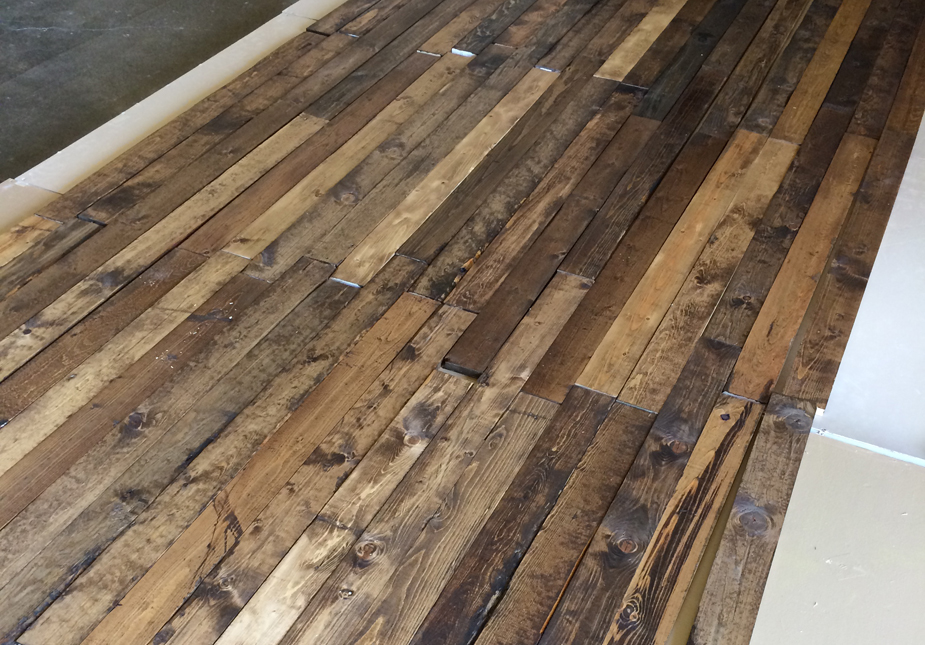
With a rag, spread the stain on 1 piece at a time.  The longer you leave the stain on the wood, the darker the final piece will be.  After the first coat dried, I went back and gave some pieces a second coat.  On the picture above, I used various coats to create the pieces but all of them (excluding the top right) are all coated with the same color stain. Remember that inconsistency is ok and is preferred here.  Here is what my pieces looked like after I was completed.
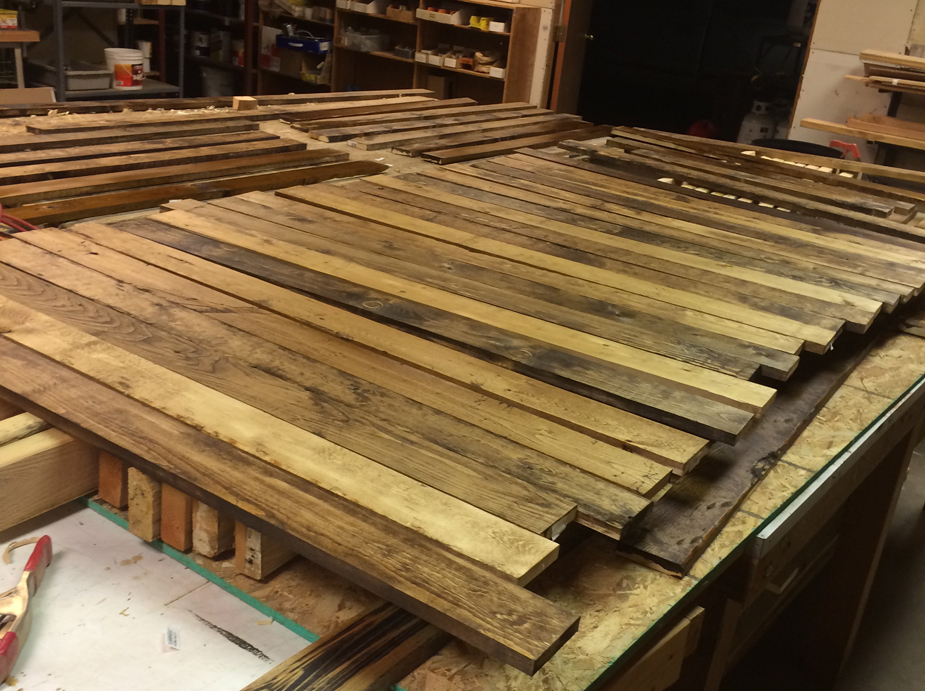
faux-pallet-wod-laid-out

Step 4. (optional)

After the wood was dry, I laid all of the pieces out to see what they would look like and see how the seams would come together.  Because most of the pieces were the exact same size, I cut the wood pieces in random widths so I would get more of an inconsistent look when I put the wall together.

Before cutting your wood, take into consideration how you will be gluing/screwing these together….the more pieces you cut, the more gluing/screwing you’ll end up doing adding time to your project

faux-wood-pieces-laid-out

Step 5.

Start at the top right of your wall, make your first row level and begin nailing into your wall.

There are various techniques to affix the pieces to your wall.  Take into consideration that if you are installing onto drywall, you will have a bunch of holes in the drywall if you ever want to remove the wall.

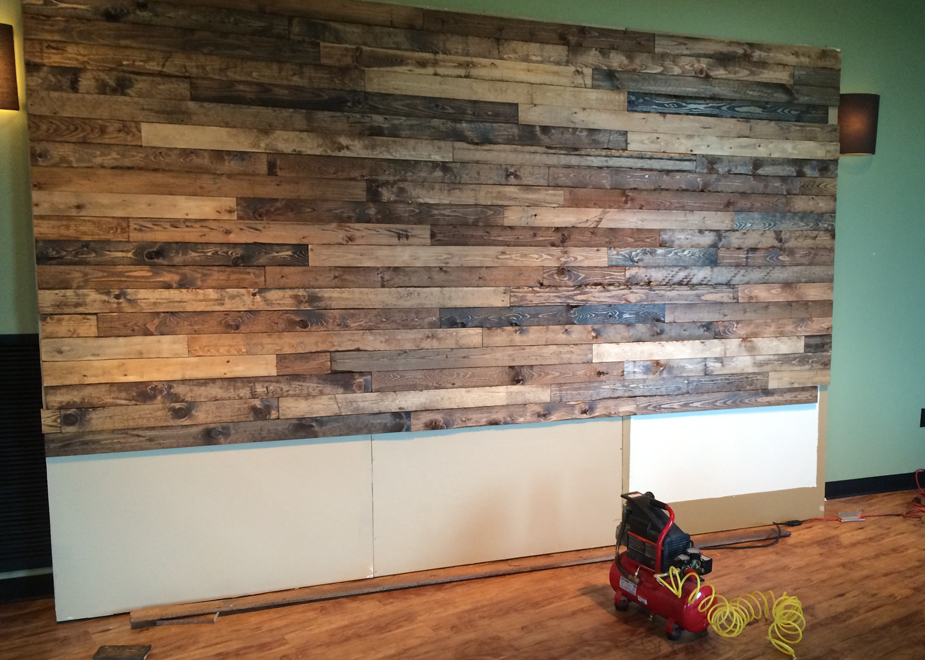
Here is what my wall turned out like (sorry for the bad photo)faux-pallet-wall-installed


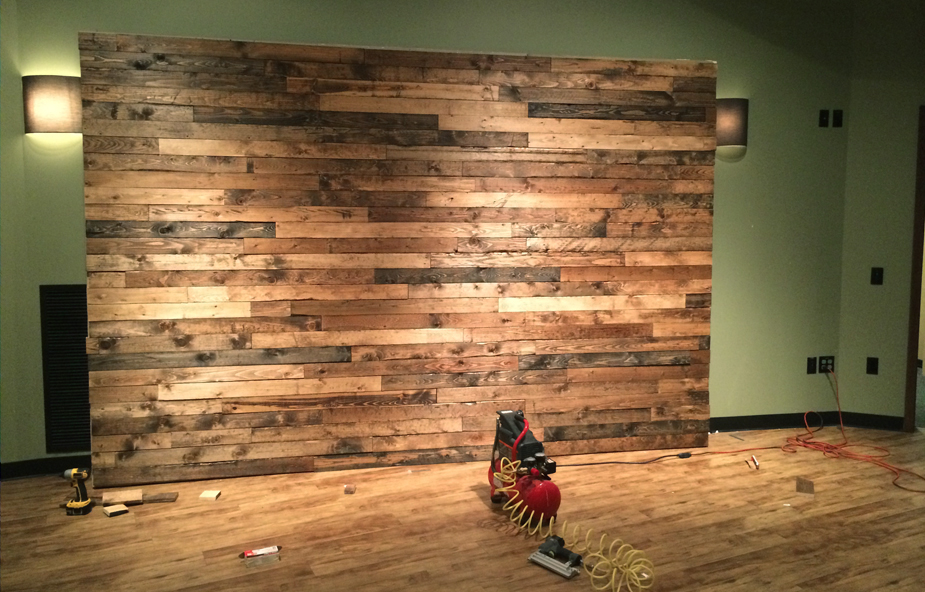
I hope this tutorial helps you on your next project!

I knew having the cut list print outs and the materials I needed all up front would save me time, but I’m amazed at the time I saved getting my wood and materials! Since all of the cuts were rip cuts, I figured I would utilize Home Depots staff to assist me 🙂 I wasn’t sure if they would do all of the cuts for me, but I figured it was worth a shot to save even more time…it worked! Their blade made really rough edges so I had to sand them down a little, but I wasn’t going to complain 🙂
home-office-homedeoptcuts
Once I got home, I pulled out my Kreg Jig and began piecing the components together. With plans in hand it was easy because I marked the individual pieces as they were cut so I didn’t have to remeasure anything and just build it. I decided to go with cabinets on either side of the desk (after my cousin suggested for stability) and since I knew how I would use the shelf space, I didn’t see a need to build adjustable shelving for this project.
home-office-cabinet

All in Place

After building all of the pieces I wanted to see how it all looked in place and to assure everything looked good in the room. Luckily everything turned out exactly like my model sketchup and how we wanted!
home-office-allinplace

Pulling Back the Carpet

A friend of mine asked me why I pulled the carpet back instead of just building it on top. There were a couple of reasons why: 1. We wanted to make this look custom and as if it were built in with the house. 2. In the long run, if we (or next owners) want to change out the carpet it would be a pain. Pulling back the carpet and building straight on the sub floor was the “right way” to do it.
home-office-carpetpulledback
After pulling back the carpet I began building it into place permanently. With the fitting before the carpet pulled back, I knew I could put the measuring tape away and just focus on putting it together.home-office-carpetpulledback1
home-office-carpetpulledback2
With the desk coming together quickly, I’m going to attempt to make some drawers 🙂

For the past few months I’ve been increasingly acquiring new clients….which is great, but requires more time sitting at the computer. Normally that wouldn’t be a problem (actually an answer to prayers) but without a desk it means working from the kitchen counter…
home-office-sittingoncounter
At our last house I built my first built-in desk after being inspired from a blog I follow that created a coffee table that resembled the tables at the Apple Store. At that point it was my biggest project so I decided against drawers or shelves and to keep it simple.
ash-st-home-office
With an achy back and a room full of boxes that was just asking for a desk, I started dreaming up solutions. I had an idea what I wanted to build, but (like most projects) I had no idea what I was doing when I started 🙂
home-office-before
I called my cousin because a few months ago he showed me plans of a closet build out that he was working on. When he showed me the plan, he was telling me how a program allowed him to spec the entire project out before he lifted a hammer. He introduced me to the Google app called “Sketchup“. After 10 minutes of talking with him I was convinced this was the best thing to do to help cut down on wasted material and an excuse to learn something new. After watching a 7 minute video I was able to get started on my project!home-office-sketchup

There are a ton of tutorials on YouTube so I wont go into the details, but trust me….though this was more work up front, it made the build time much faster.

I also utilized Cut List Pro to minimize the waste in materials. Cut List allows you to input all of your cuts (exported from Sketchup) and gives you a shopping list of materials you need. It also shows you the most efficient way to rip your boards from your material and if you know the cost of things, you can create an estimate for the project. They also have an ipad app.
home-office-cutlistpro
Now that I had my desk designed, cut list in hand and in project mode….I needed to clean up the room so I would have somewhere to put the desk.

Next up, making the cuts, building the components, pulling back the carpet and piecing this thing together!

Living Room Book shelves: Part 4

At this point it seems like it’s taken forever to get this far (because it has) but totally worth it. Even if she was just trying to make me feel better,Allegra told me how awesome it was looking and knew I could do this. 🙂
With my confidence high and learning how this all works, putting together the left side took half the time!

Builtin-Book-Shelves-26
The wall on this side was more square which made things much easier! The one thing that set me back was I assumed something else…that the outlets were the same distance from the fireplace on each side. I figured since I didn’t see with the naked eye how off the walls and fireplace were before starting the project, no one would see that one of the shelves was spaced a little further apart on the left. I moved it over about 3/4″ and cut the outlet faceplate to limit how far I had to go.

Builtin-Book-Shelves-27
Now I was set to install the face frames! I went with MDF because it came primed with rounded edges cutting time out of the final touches. This part took no time at all and the results made a dramatic change on the way it all looked.

Builtin-Book-Shelves-28
It was super cold outside and after spending an hour in the garage cutting and adding trim to the front of all of the shelves, I brought everything into the house to finish up.
Builtin-Book-Shelves-29
Once the shelves were dry and everything calked up, it was time to see how everything looked together. I couldn’t believe I did it! woohoo.

Builtin-Book-Shelves-30
Now, I just need to feed all of the wires through the wall, re-cut the far right shelf so it fits :), a little touch up paint on the walls, call a carpet guy/gal to come out to stretch the carpet then I can unleash Allegra to beautify this thing!

Living Room Book shelves: Part 3

Looking at what I’ve completed and how long it took to complete it, I started to think I needed pick up the pace. So I started the day off with installing the back of the unit (my walls are textured and I didn’t want to deal with smoothing out the walls). I cut some fiberboard to size, nailed it into place and after a little masking painted everything.
Builtin-Book-Shelves-20

(yes, the net project I will use more than my iphone to take pics)

Seeing it all painted showed how big the piece was going to be which was scary and exciting at the same time….so far so good, now to get the shelves going.
I grabbed a piece of pegboard that was laying around (because I saw a cool tip on Pinterest) and used it as a template to drill adjustable shelves. Since it isn’t realistic that someone would need to have a gazillion holes to adjust shelves, I eyeballed the height on the first one, then made sure every other one matched the height. I drilled a hole into a scrap piece of wood to use as a stop so that I didn’t drill through the entire piece of wood…super handy.
Builtin-Book-Shelves-21
One mistake I made was assuming the walls and fireplace were square. At first I thought I was going to have to cut a new piece to compensate for the gap, but I thought I’d try to make a shim and it worked! A lot of sanding in a tight space made it look like it was never there.
Builtin-Book-Shelves-25
Though painting is my nemesis, I didn’t want to crawl under everything once assembled to get everything painted. So far, painting and waiting for the paint to dry has taken the longest time in this project. (note to self: find a sucker friend who loves painting and have them “help” with the next project :))
Once everything was dry, it was time to get things put together so I can do another victory dance and show my kids some dance moves.
Builtin-Book-Shelves-22

[insert victory dance and singing here]

At this point, I realized that I was leaving out my handyman so I gave him a project….sign the base so that his mark is in this house forever. I then assembled the base of the left side and (luckily) with a lot of measuring everything fit perfectly.
Builtin-Book-Shelves-23
I ended the weekend with my favorite task painting the back and installing everything so I can get right into building tomorrow.
Builtin-Book-Shelves-24
Things are starting to shape up!! I’m pumped about getting the left side built up so I can finish this guy!

Living Room Book shelves: Part 2

Waking up to the carpet pulled back with the sub-floor exposed gave me a little bit of motivation to get something started for the day! I started with mistake one: measuring the height from the carpet…
Builtin-Book-Shelves-06

note: save yourself some time and headache….measure from the ground you’ll be building on not the top layer…or it will end up wasting material, time and looking something like this:

Builtin-Book-Shelves-15
I grabbed some breakfast, recruited an assistant to help remeasure the rights height of by base and began ripping stripes from a sheet of poplar I had in the garage…
Builtin-Book-Shelves-14
Builtin-Book-Shelves-16
Having a nail gun saved soooo much time this second time around. I squared everything up and used 2″ brad nails to keep everything together. Once pieced together I went back and used some screws to to make sure these puppies weren’t going to fall apart on me (overkill maybe but I’d rather play it safe).
With the base in place I grabbed some shims to level everything out….everything seemed to be off so I took my time to make sure on this part. I started with the base because I was super confident in my measuring skills and since the height of this piece was crucial to looking right with the fireplace I took the least likely route I’d mess up on measurement 🙂 Builtin-Book-Shelves-18
After placing the base down and leveling it I remeasured the base to cut the top from 3/4″ poplar plywood. This stuff has super strength…again, maybe overkill but my biggest fear was that I would make all this effort convincing <ahref=”http://allegralove.com”>Allegra to let me build this, build it and when she put a book on it, it came crashing down…haha.
I thought I would accomplish more in half of a morning, but with the little set back, it took more time that I expected (pretty common).
Builtin-Book-Shelves-19
Once installed, I took a step back…looked at my progress….and sing a little victory tune in my head “dunna….dunna, dunna, dunna, eigh eigh, eigh”.
I’m half way done with this project. now ready to build the shelves things and finish phase one.

Living Room Book shelves: Part 1

If you know me, you know I don’t do so well in chaos….I like order. We just moved two weeks ago, but coming into the house to see this was driving me nuts.Builtin Book Shelves-01
As we were packing up the Penske truck to move to Oregon, someone responded to our craigslist ad wanting to buy our entertainment center. We were, literally, 5 minutes from packing it up finding a place to put it in the truck when we sold it. Small victory at the time until we moved here to find we had no space for our stuff! Thus… #timeforaproject
To gain sanity, Allegra and I cleared everything out of the living room and rewarded ourselves with some wine.
Builtin Book Shelves-08
As we sat there my mind started wondering off on what I could attempt to build to gain space for everything. I’ve never attempted a project this big so I started by searching through Pinterest and sketching what I was thought would look good so I had some supportive items when convincing Allegra 🙂 Luckily it didn’t take much effort, she was stoked….and I think terrified when I told her how I would need to do it).
sketching-dreaming
I started by pulling back the carpet, removing the tack strip and clearing out the mess. The easiest way I found to pull up the carpet was to go to the corner of the area I was working, grab a piece of carpet and pull it up and toward me.

note1-living-room-book-shelves-part-1

Builtin Book Shelves-10
I finished the day off with removing the back baseboard, clearing out the old staples and vacuuming clean for a nice clean start for tomorrow.
Builtin Book Shelves-13
Stay tuned for Living Room Book shelves: Part 2